Dizzy
It began with a diz, or the lack thereof.
This past sunday, I spent a relaxing day with Etherknitter and learned the art of wool combing. I'd bought a set of Indigo Hound 5-pitch english combs about fifteen years ago and am slightly embarassed to admit that I've hardly used them—mainly because I couldn't get the knack of how they work. I've got it now, and I'm finally salvaging the lackluster prep job that was done to a nice border leicester fleece by a mill that shall remain nameless.
Upon returning home I set up the combs, but couldn't find the diz. What's a maker to do? Make a new one.
I rooted around in my (small) wood stash and found a nice slice of black-and-white ebony. This stuff is very dense, and is difficult to cut and work, but it polishes wonderfully.
 I now had a fine-looking diz, but I had no (stylish) way of feeding the fiber in. I needed a threader. Back to the stash for some spindles, which I had in maple, cherry, and oak.
After a trip back to the metal studio for some cutting, sanding, bending, and finishing (with the now-infamous tung oil), I had a threader... or four.
 But why stop there? Why not make some orifice hooks to go with them? And how about adding some silver accents? Wouldn't these look great in ebony?
I think it's finally time sign up for that woodturning class...
Cardinal numbers...
 The other day, as I was looking out the window in front of my desk at work, I noticed a cardinal disappearing into the bamboo. When I took a closer look, I saw the nest.
This is the third nest that this pair of cardinals has built in the bamboo garden here at the office. It's a great place for babies; it's fully enclosed, with access only from the sky or from our office. Of course, they have to put up with curious engineers staring at them through the glass, but I imagine that's a small price to pay for safety.
Here's my workspace. See the red arrow? That's where the nest is. I'm thrilled that I have a front-row seat.
Wheee!

Free fall...
(Or what you do when you've been sitting in meetings for 8 hours and can't pay attention for another second...)
Eye candy for the feet

Kaffe Fassett for socks. Need I say more?
True grit
I've always loved to tinker. I get it from my dad who is, among other things, a talented cabinetmaker, mechanic, and all-around fiddler with things. (I also play the fiddle, but that's a story for another day.) My dad was always tinkering with and fixing things around the house. He was my first teacher, and he taught me the art of using sandpaper.
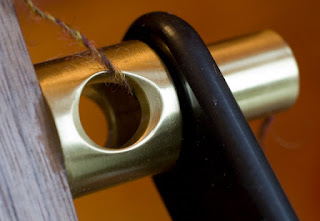 Having spun on my new saxony for a few days, I noticed that the fiber was making a lot of noise as it flowed through the orifice. This wheel is unusually quiet so the noise (and the vibration) was irritating. Having successfully tamed the steel orifice on my Schacht, I couldn't wait to tinker with the lovely brass orifice on the Lendrum.One of the reasons I love wet/dry sandpaper is that it works equally well on wood or metal. I used the same 400- and 600-grit papers I used on the wood to polish the orifice. I wet the 400-grit, and being careful not to get any water on the wood, sanded inside the openings and around the outside. Brass is fairly soft, so by rolling a small piece of sandpaper into a tube I was able to quickly sand all the edges and smooth out the sharp spot around the front opening. Switching to 600-grit and using just a little water, I buffed the metal to a soft shine. Now the wheel is silent, incredibly fast, and the metal glows.
 And should you be curious as to what fiber is flowing onto the bobbin, it's Persimmon Tree's wool and mohair in the colorway, "Autumn Leaves."
One last observation: tinker spelled backwards is reknit. The former is an obsession. The latter is, well, an obsession I'd rather not cultivate.
Voila!
 The Lendrum Saxony is finished!
Yesterday I gave all the parts a final polish with a clean cloth and reassembled. Before screwing down the stops on the wheel posts I installed both a cotton string for DD and a stretchy plastic drive band for scotch tension. If you've ever joined the ends of a plastic drive band you'll know that it's far easier to do so off the wheel than on. It spins wonderfully in either mode, so I have the best of both worlds.
 I'm very happy with how the finish turned out. I would encourage anyone who is considering buying an unfinished wheel to not be intimidated by the prospect of finishing it. All you need is patience. The key to a beautiful finish on hardwoods like maple, cherry, and walnut is the sanding. If you do a meticulous job of sanding using progressively higher abrasive grits (180 to 320 to 400/600 to 0000 steel wool or a nonwoven abrasive pad), the application of the finishing compound becomes a no-brainer. You just wipe it on, wipe it off, let it dry, and buff or sand lightly with fine steel wool. Repeat one or two more times and it'll look great.
 You also can't go wrong with tung or linseed oil. If I had been finishing a maple or a cherry wheel I might have used Tried & True Original Wood Finish instead of 100% tung oil. This product, which is a combination of linseed oil and beeswax, smelled great and gave me a wonderful finish, but it darkened the walnut more than I wanted. On maple or cherry it would be gorgeous.Now it's time to start spinning. First up: Corriedale laceweight singles. This wheel makes it so easy...

Sandpaper and Tung Oil
After initial assembly and a test spin, I took apart the Lendrum Saxony in preparation for finishing. I'm using tung oil, which along with linseed and a couple of other oils is known as a "drying oil". This means it will eventually harden into a durable, water-resistant finish.
Why tung oil? Well, I knew I wanted a more old-fashioned finishing compound that wasn't loaded with organic solvents, so that ruled out Watco and all the so-called wipe on "Danish oils" and polyurethane finishes. I also didn't want to darken the walnut, so that ruled out the linseed oil-based finishes. Finally, I wanted a matte rather than a glossy finish. Tung oil won in every category.
The Finishing Process
The wheel came to me reasonably well-sanded by Lendrum, but it needed a bit more work before I'd call it "finish sanded." On the rough spots I started with 180-grit wet/dry sandpaper followed by 320-grit sandpaper. Where the wood was fairly smooth I started with 320-grit. (I prefer the black wet/dry papers to the standard aluminum oxide papers commonly used by woodworkers. They last longer, and they bend more easily to fit the curves.) I then went over all the pieces again with maroon and grey non-woven abrasive pads. These wonderful scrubby pads are the same as 00 and 000 steel wool. I use them a lot in jewelrymaking and they're great—no steel wool filings to pick out of your fingers when you're done. Finally, I gave the flat parts an additional pass with 600-grit sandpaper. As is often the case on turnings, there were a few rough spots on the wheel spokes and the legs. I sanded these with successive passes of 180, 320, 400, and 600-grit sandpaper. Anything I couldn't smooth down I just left to be worked on later. Once the first coat of tung oil was dry, I'd be better able smooth the spot. After wiping the dust off all the pieces with a tack cloth, I was ready to apply the first coat of oil.
Tung oil straight out of the bottle is similar in consistency to maple syrup. To help the first coat penetrate into the wood, I thinned the oil about 1:1 with mineral spirits. Fortunately, the weather was nice and I could work outside. Using a small rag (and wearing latex gloves), I wiped on a coat of oil. The trick is to use the right amount: enough to look shiny, but not enough to drip. I let the oil penetrate for about 5 minutes then I wiped the surface dry. Tung oil doesn't dry by solvent evaporation in the traditional sense, but gradually  polymerizes on contact with air. As this process begins to happen the surface gets sticky. It's important to wipe the residue off before the surface gets too sticky to wipe. After all the pieces were oiled and wiped, I waited a day or two for them to dry thoroughly. The difference between done and not done is amazing.After everything had dried, I got out the sandpaper, scrubby pads, and steel wool and started again. I went over each surface with 600 grit sandpaper, the grey pad (000), and 0000 steel wool. The wood glowed. I paid particular attention to the rough spots and was able to to smooth down most of them.
 At this point, the wood already looked so nice that I decided to apply only one more coat of oil. Tung oil may be applied many times, so I can always put another coat on at some point in the future. This time I used the oil right out of the bottle at 100%. I wiped on a very thin coat and rubbed it in with my hand (this is why it's called a hand-rubbed finish!) When most of the oil had absorbed and the surface was getting sticky, I wiped it dry and set it aside.
Fast-forward another day. I've started buffing each piece with 0000 steel wool. The finish is amazing: just a slight sheen and lots of depth. As soon as all the pieces are done I'll reassemble and start spinning.
My hands are sore from the endless sanding and I've been getting by on less sleep than usual this last week, but the end result will be worth the effort. This wheel is a lovely piece of functional art.

 I now had a fine-looking diz, but I had no (stylish) way of feeding the fiber in. I needed a threader. Back to the stash for some spindles, which I had in maple, cherry, and oak.
 But why stop there? Why not make some orifice hooks to go with them? And how about adding some silver accents? Wouldn't these look great in ebony?


